🌐 Setup Web Push
Web Push Notifications allow you to engage users directly through their web browsers, even when they're not on your website. This guide will walk you through setting up Web Push Notifications using NotificationAPI.
Overview
To set up Web Push Notifications with NotificationAPI, you'll need to:
- Create a Notification Template in the NotificationAPI Dashboard.
- Implement the Frontend SDK on your website.
- Set Up the Service Worker on your website.
- Give permission on your browser.
- Send Notifications from the Backend using NotificationAPI's Backend SDKs.
Step-by-Step Implementation
Step 1: Create a Notification Template
- Log in to the NotificationAPI Dashboard.
- Create a new notification template.
- Enable "Web Push" as a channel.
- Customize the template to suit your needs.
Step 2: Implement the Frontend SDK
Integrate the NotificationAPI Frontend SDK into your web page to handle user subscriptions and display notifications.
Setup & Initialization: Choose between installing via a package manager or including the SDK directly in your HTML.
- React
- Vanilla JS
- UMD
npm install @notificationapi/react --legacy-peer-deps
# or
# yarn add @notificationapi/react
# or
# pnpm add @notificationapi/react
import { NotificationAPIProvider } from '@notificationapi/react';

<App>
  <NotificationAPIProvider
    clientId="abc123" // your clientId found on the dashboard
    user={{
      // logged in user
      id: 'abcd-1234'
    }}
    customServiceWorkerPath="custom path to your service worker file" //optional
  >
    {/* your protected routes */}
  </NotificationAPIProvider>
</App>;
Parameters
| Parameter | Type | Description |
|---|---|---|
| clientId* | string | Your NotificationAPI account clientId. You can get it from here. |
| userId* | string | The unique ID of the user in your system. |
| webPushOptInMessage | "AUTOMATIC" or Boolean | Control to show the web push opt in message. Default is "AUTOMATIC" |
| customServiceWorkerPath | string | Path to your service worker file if it's not at the root (e.g., '/custom/path/notificationapi-service-worker.js'). |
* Required parameters
For more information please checkout our React SDK guide.
npm install notificationapi-js-client-sdk
# yarn add notificationapi-js-client-sdk
# pnpm add notificationapi-js-client-sdk
import NotificationAPI from 'notificationapi-js-client-sdk';
import 'notificationapi-js-client-sdk/dist/styles.css';
const notificationapi = new NotificationAPI({
  clientId: 'YOUR_CLIENT_ID',
  userId: 'UNIQUE_USER_ID'
});
Parameters
| Parameter | Type | Description |
|---|---|---|
| clientId* | string | Your NotificationAPI account clientId. You can get it from here. |
| userId* | string | The unique ID of the user in your system. |
| customServiceWorkerPath | string | Path to your service worker file if it's not at the root (e.g., '/custom/path/notificationapi-service-worker.js'). |
* Required parameters
For more information please checkout our vanilla JS SDK guide.
<script src="https://unpkg.com/notificationapi-js-client-sdk@4.4.0/dist/notificationapi-js-client-sdk.js"></script>
<link
  href="https://unpkg.com/notificationapi-js-client-sdk/dist/styles.css"
  rel="stylesheet"
/>
const notificationapi = new NotificationAPI({
  clientId: YOUR_CLIENT_ID,
  userId: UNIQUE_USER_ID
});
Parameters
| Parameter | Type | Description |
|---|---|---|
| clientId* | string | Your NotificationAPI account clientId. You can get it from here. |
| userId* | string | The unique ID of the user in your system. |
| userIdHash | string | Only used for Secure Mode. |
| websocket | string | Only if you want to specify your region, for example, if your account is in Canada region you must pass 'wss://ws.ca.notificationapi.com'. |
| language | string | The language used for the pre-built UI widgets. Supported: en-US, es-ES, fr-FR, it-IT, pt-BR |
| customServiceWorkerPath | string | Path to your service worker file if it's not at the root (e.g., '/custom/path/notificationapi-service-worker.js'). |
* Required parameters
For more information please checkout our vanilla JS SDK guide.
Step 3: Service Worker Setup
The service worker manages background tasks and is essential for receiving push notifications.
- Download notificationapi-service-worker.js
- Place the file in the
publicfolder of your web application. It should be accessible athttps://yourdomain.com/notificationapi-service-worker.js.
If the service worker is not at the root, specify its path using the customServiceWorkerPath parameter during SDK initialization. For example, it is accessible at https://yourdomain.com/service/notificationapi-service-worker.js, please specify its path using the customServiceWorkerPath parameter during SDK initialization.
- React
- Vanilla JS
<NotificationAPIProvider
  userId="YOUR_CLIENT_ID"
  clientId="UNIQUE_USER_ID"
  customServiceWorkerPath="/service/notificationapi-service-worker.js"
>
  {/* Your components */}
</NotificationAPIProvider>
const notificationapi = new NotificationAPI({
  clientId: 'YOUR_CLIENT_ID',
  userId: 'UNIQUE_USER_ID',
  customServiceWorkerPath: '/service/notificationapi-service-worker.js'
});
Step 4: Give permission on your browser
Option 1: Use NotificationAPI Pre-Built Component (Recommended)
Our SDKs provide an easy way to prompt users for permission to receive web push notifications.
- React
- Vanilla JS
If you are using the popup component, click on the ⚙️ icon, which is there in the top right corner.


This would prompt the browser to ask for permission to show notifications.
Option 2: Using built-in method You can use useNotificationAPIContext.
const AskforPerm: React.FC = () => {
  const notificationapi = NotificationAPIProvider.useNotificationAPIContext();

  return (
    <Button
      onClick={() => {
        notificationapi.setWebPushOptIn(true);
      }}
    >
      Click to ask for permission
    </Button>
  );
};

export default AskforPerm;
You can see the opt in message in both the notification components and user preference components.
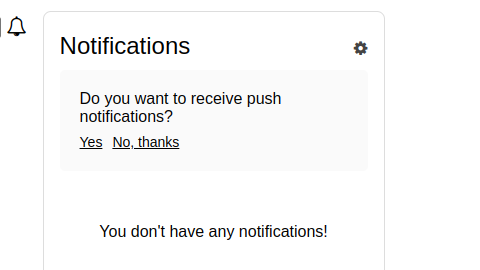
If you are using the popup component, you can click on the ⚙️ icon and then click on the settings icon, which is there in the top right corner.

This would prompt the browser to ask for permission to show notifications.
Option 2: Using built-in method You can use the following method to ask your user to opt in for the web Push notifications:
notificationapi.askForWebPushPermission();
Step 5: Send Notifications from the Backend
With the frontend set up to receive notifications, you can now send them from your backend.
- Integrate the Backend SDK: Use NotificationAPI's Backend SDKs to send notifications programmatically.
- Send a Notification: Follow the guide to start sending notifications.
Schematic Diagram
Below is a detailed schematic that breaks down each step:
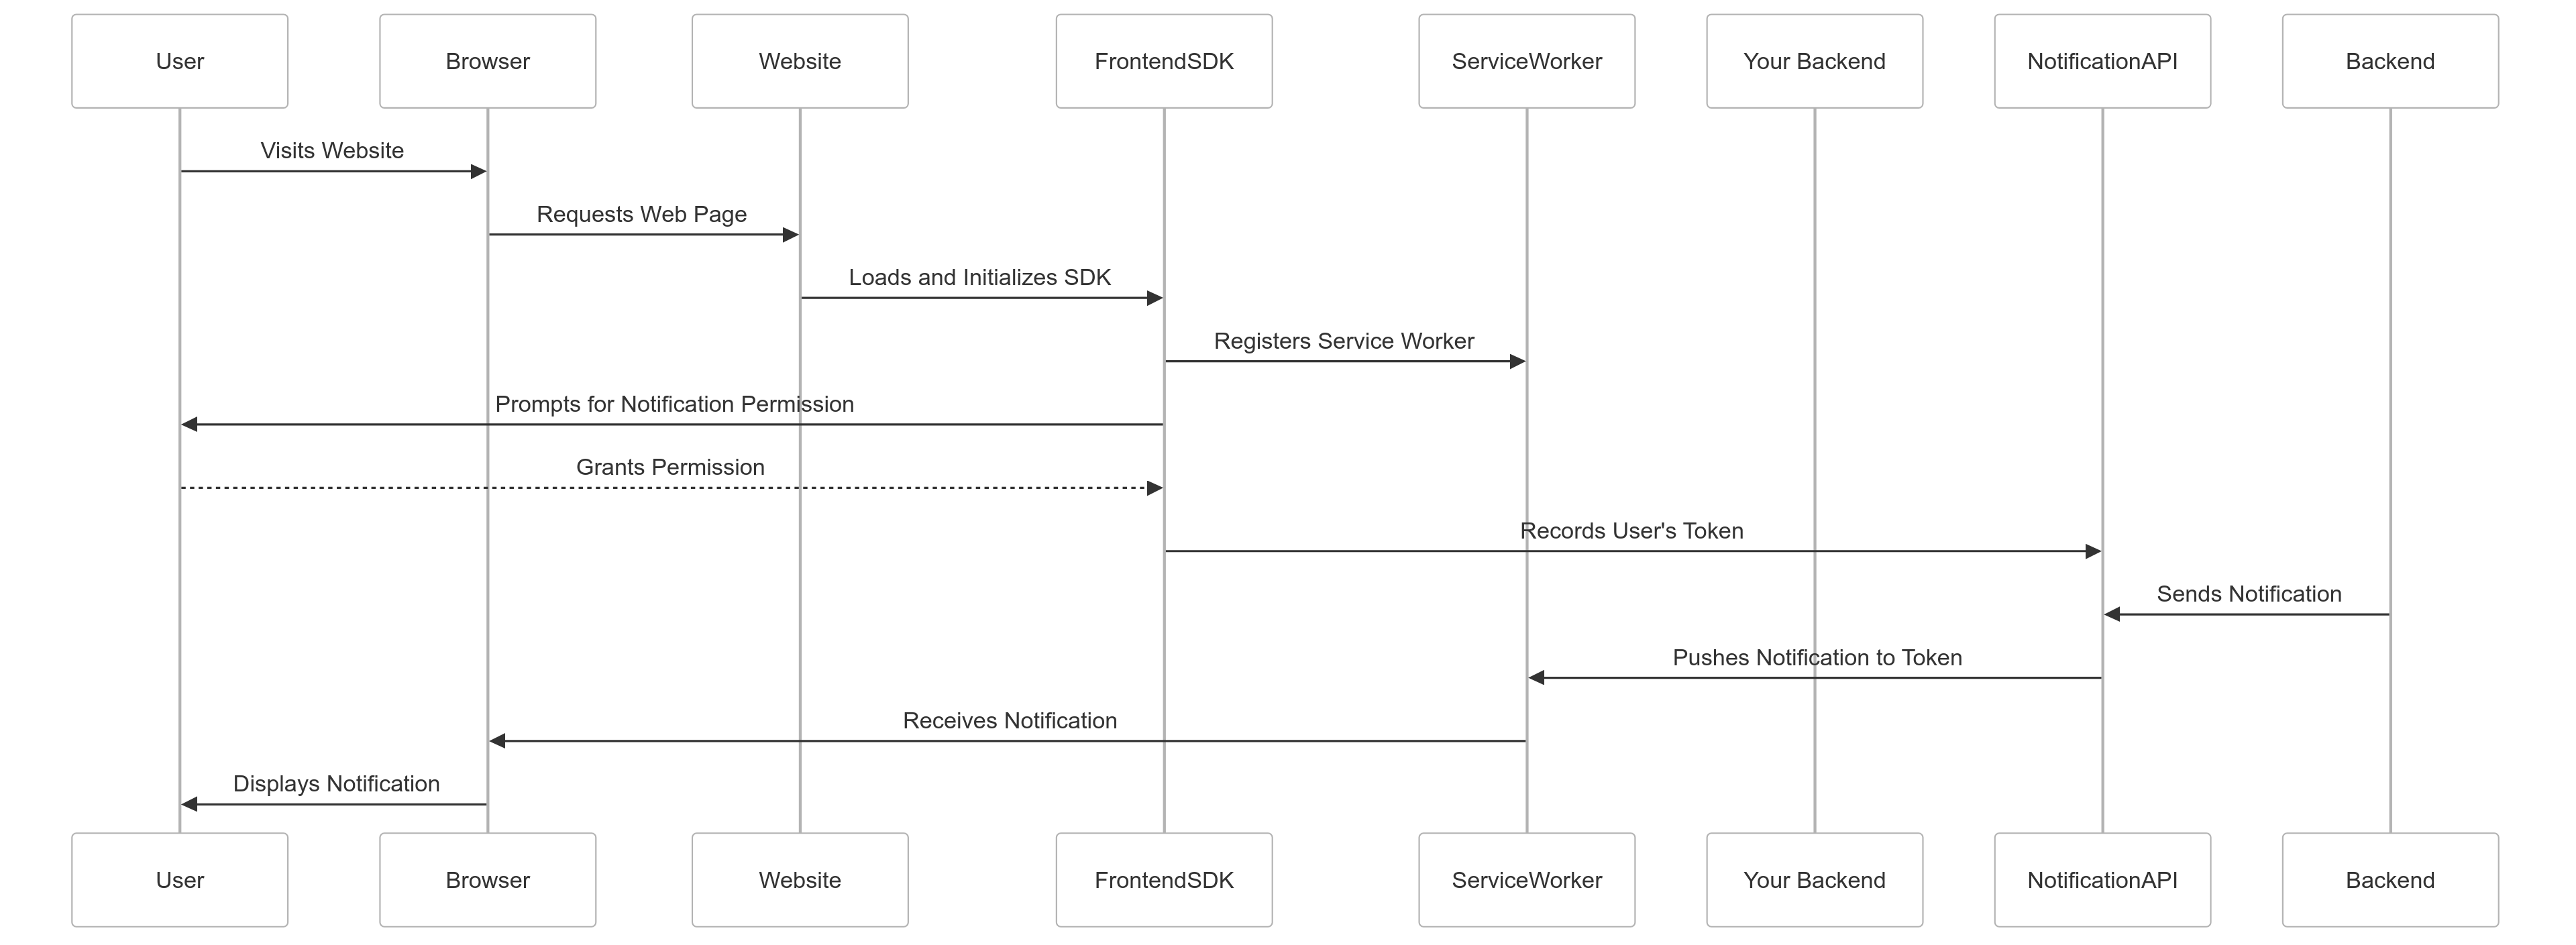
Steps Explained:
- User Visits Website: The user navigates to your website using their browser.
- Frontend SDK Initialization: The website loads the Frontend SDK, which initializes and registers the service worker.
- Service Worker Registration: The service worker is essential for handling background tasks and notifications.
- User Permission Prompt: The SDK prompts the user to grant permission for notifications.
- User Subscribes: Upon granting permission, the user is subscribed to receive notifications.
- Backend Sends Notification: An event in your system triggers the backend to send a notification via NotificationAPI.
- Notification Dispatch: NotificationAPI processes the request and dispatches the notification to the user's browser.
- Browser Receives Notification: The service worker receives the notification in the background.
- Notification Displayed: The browser displays the notification to the user, even if they're not on your website.
Frequently Asked Questions (FAQs)
Why I see this message: WEB_PUSH delivery is activated, but the user's webPushTokens is not provided. Discarding WEB_PUSH.?
It means that you have done Step 1 and Step 5 correctly, but you probably have not implemented our frontend SDK correctly (Step 2), or you have not set up the service worker (Step 3), or your user is not opted in for receiving web push notification (Step 4).
Why can I not see the browser prompt in Step 3?
If you do not see the message in the NotificationAPI component, that browser has already opted in for that user.
Reset Chrome on Desktop
- Click the "View Site Information" icon next to your URL in the Chrome browser.
- Under "Notifications", click the Reset permission button.
Reset Firefox on Desktop
- Click the "i" or "lock" icon beside your site URL.
- Next to Receive Notifications under Permissions, select the "X" button next to Allowed
How can I make sure if the Service Worker has been initialized properly?
Solution
-
Follow the Step 3
-
Open the built-in developer tools for the site (F12 on PC or fn + F12 on Mac), then go to Applications >> Service workers. If the service worker has been initialized, it would look something like this:
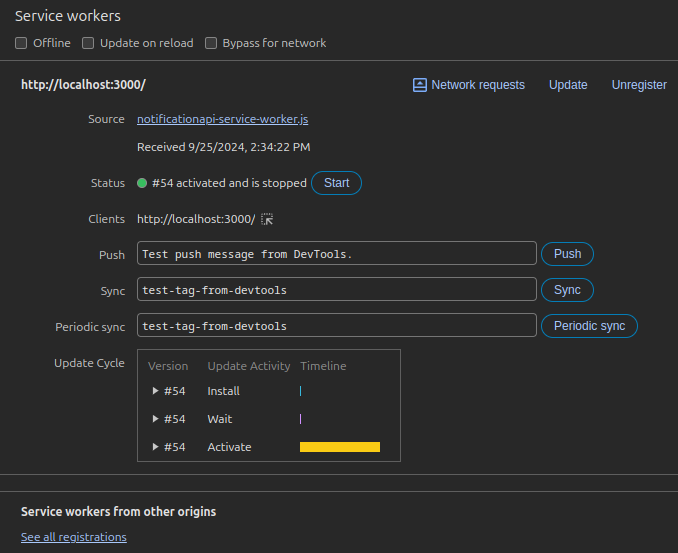
- If notificationapi-service-worker.js (Service Worker) doesn't show up, that means the service worker is not there inside the public folder. Please make sure that it is placed inside the public folder. Or pass the address to the publicly available file using
customServiceWorkerPath
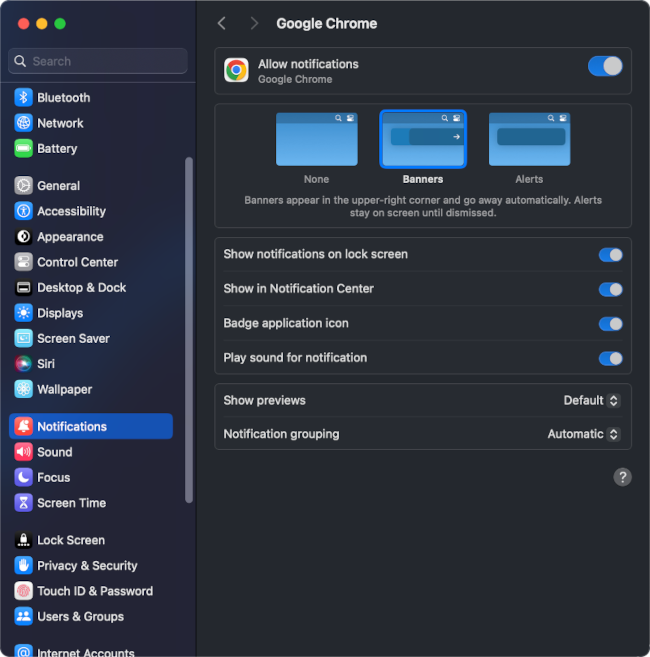
How to check Notification Settings on macOS and Windows
It's important to verify your notification settings at your operating system level as well to ensure proper functionality.
macOS
- Go to System Preferences > Notifications.
- Find your app (chrome, firefox, safari, etc...) in the list and ensure notifications are enabled.
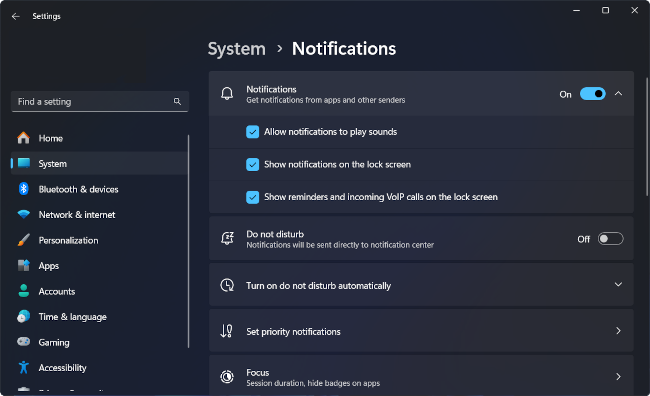
Windows
- Open Settings > System > Notifications.
- Ensure to enable Notifications for proper functionality.